New Garage Doors Leduc Lock Surgeon
New Garage doors supplied and installed for residential homes
Lock Surgeon's new garage door mobile Leduc installation serviceman can provide new garage doors for renovation or new construction. Lock Surgeon Leduc will come to your home and remove the existing old garage door. Dispose of the garage door and supply and install a new garage door to match your new garage door size and style requirements. Lock Surgeon's Leduc new garage doors come in a variety of sizes, shapes and material types. Lock Surgeon's selection of new garage doors can be viewed by having Lock Surgeon's Leduc new garage door replacement serviceman come to your home. He will review your new garage door needs and present you with new garage door options by way of brochure or internet new garage door product displays. Lock Surgeon New Replacement Residential Home Garage Doors Leduc.
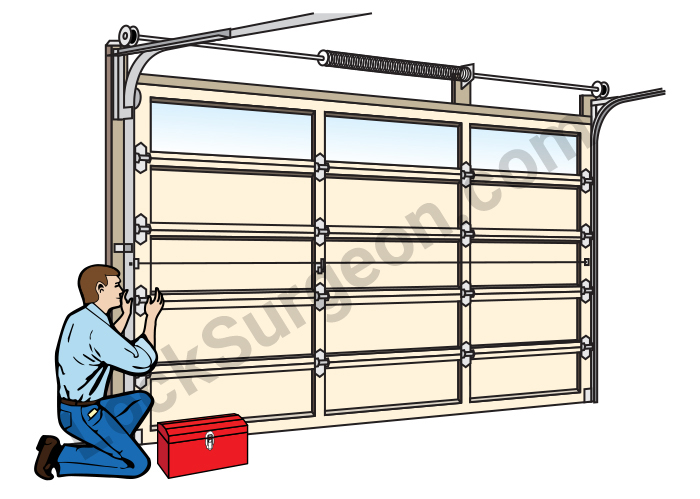
Leduc New garage doors can be supplied by Lock Surgeon the best of which are the New Steelcraft Garage Doors
New garage doors that are environmentally friendly, supplied and installed in Leduc
New garage doors made with a polyurethane isulation process that is CFC and HCFC free. The elimination of all CFC's and HCFC's from the polyurethane foam insulated new garage doors results in zero Ozone Depletion Potential and zero Global Warming Potential rating. No other new garage door insulation offers higher R-value resulting in improved energy efficiency for your Leduc home. Lock Surgeon's Leduc mobile residential new garage door installation serviceman can match your garage door renovation needs to a new garage door to improve the looks and insulation of your garage.
New Garage Door Replacement for Residential Homes Leduc
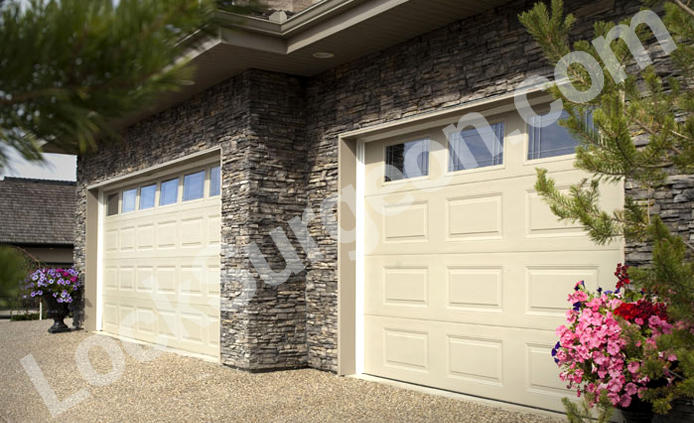
Thermocraft Series
Ranchcraft Series
Carriage Series
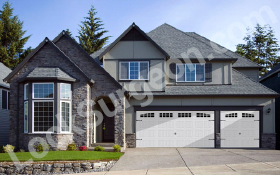
Flush Series

Height to Panel Ratios
| Height | 21" panels | 24" panels | Total panels |
| 6' | - | 3 | 3 |
| 7' | 4 | - | 4 |
| 7' 3" | 3 | 1 | 4 |
| 7' 6" | 2 | 2 | 4 |
| 7' 9" | 1 | 3 | 4 |
| 8' | - | 4 | 4 |
| 8' 9" | 5 | - | 5 |
| 9' | 4 | 1 | 5 |
| 9' 3" | 3 | 2 | 5 |
| 9' 6" | 2 | 3 | 5 |
| 9' 9" | 1 | 4 | 5 |
| 10' | - | 5 | 5 |
Residential Garage Door Windows
Lock Surgeon Leduc can provide windows for Steel Craft's snap-in window design. New garage doors that offer easy access for window cleaning and allows you to change your design without replacing your glass. Each new garage door window insert is treated with UV protection paint to help prevent fading. Lock Surgeon's Leduc mobile new garage door serviceman can also offer a series of decorative design windows in sealed glass units with inlaid muntin bars.
Plain Lite
Available in 5/8" ThermoPane.

Clear

Satin
Snap-in Decorative Designs
Available in 5/8" ThermoPane.

Sunburst - 3 Panel

Sunburst - 4 Panel

Sunburst - 6 Panel

Somerview

Stockbridge

Cascade

Stockton

Ridgewood

Waterton

Colonial

Ruston
Inlaid Muntin Bars
Available in 5/8" ThermoPane Muntin Bars in White, Pewter, or Brass.

Stanton

Sunray

Regal

Royal
Tested Tough
Every door is finished with a factory applied, baked-on, two coat polyester paint finish, giving years of maintenance free operation.

White

Linen

Sandstone

Almond

Brown
Note: Accuracy of colours displayed may vary depending on the settings of your monitor. To obtain an exact colour reference, please contact Lock Surgeon at 780-448-9498 for colour samples.
Lock Surgeon's #1 Choice in New Residential Home Garage Doors Leduc
Leduc New Garage doors built to last
At first glance, many new garage doors may appear similar, but a new garage door is about much more than how it looks. Steel Craft new garage doors are distinctive in appearance, More importantly they're born and raised in cold weather. They offer better protection from the elements through superior garage door engineering.
Lock Surgeon Leduc's Steel Craft garage doors use the finest quality Canadian galvanized steel finished with primer and exterior polyester paint. This paint acts as a barrier - protecting the underlying zinc coating and extending the life of your new Leduc garage door.
Increased weather protection for your new Leduc garage door
The highest possible grade of perimeter weather-stripping provides excellent protection from outside elements. Continuous weather seal is inserted between each garage door selection, preventing air from getting through. Lock Surgeon Leduc uses an arctic grade, bulb-shaped floor seal that conforms to minor floor irregularities to keep air, dust, dirt and moisture out.
Embossed wood grain new garage door panels Leduc

Blend the beauty of wood grain with the durability of steel. Lock Surgeon's unique and well-defined panel designs add character to the exterior of your home and elevate any architectural design.
Virtually maintenance free new garage doors Leduc
Every new Leduc garage door is finished with a factory applied, baked-on, two coat exterior polyester paint. This gives years of maintenance free garage door operation. The seamless steel inside skin brightens the interior of the garage door and is easy to keep clean.
Your new garage door is sure to stay warmer and more secure with a garage door built for cold conditions.
| Door Product | R_Value | Thickness | Available Widths | Standard Height | Available Colours |
| ThermoCraft T-12 |
10.4 | 1, 1/8" | 8', 9', 10', 12', 14', 15', 16' | 6' - 10' | White, Sandstone, Linen, Almond, Brown |
| ThermoCraft T-16 |
16.04 | 1, 3/4" | 8', 9', 10', 12', 14', 16', 18' | 6' - 28' | White, Sandstone, Linen, Almond, Brown |
| RanchCraft RC-10 |
16.04 | 1, 1/8" | 8', 9', 10', 12', 14', 16' | 6' - 10' | White, Sandstone, Linen, Brown |
| RanchCraft RC-16 |
16.04 | 1, 3/4" | 8', 9', 10', 12', 14', 16', 18' | 6' - 28' | White, Sandstone, Linen, Brown |
| Flush | 12.6 | 1, 3/8" | 8', 9', 10', 12', 16', 18' | 6' - 10' | White, Sandstone, Linen |
| CarriageCraft CC-10 | 10.4 | 1, 1/8" | 8', 9', 10', 12', 14', 16' | 6' - 10' | White, Sandstone, Linen, Brown |
| CarriageCraft CC-16 | 16.04 | 1, 3/4" | 8', 9', 10', 12', 14', 16', 18' | 6' - 28' | White, Sandstone, Linen, Brown |
ThermaTech
New Residential Garage Doors Leduc
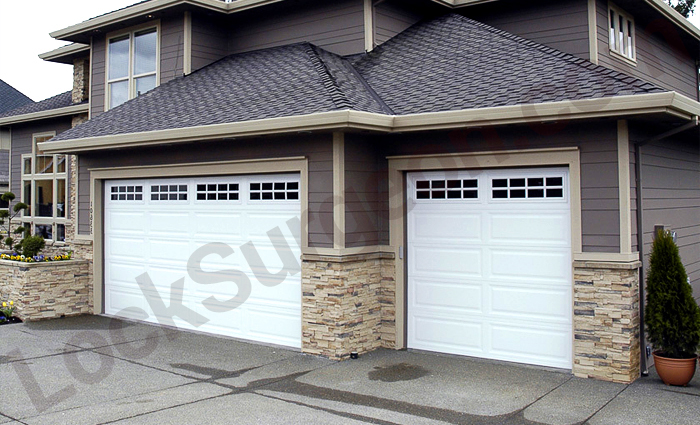
Beautiful & Functional Replacement Garage Doors Leduc
Your Leduc garage door is typically one of the most prominent visual features on your home. However, your garage needs to be more than just attractive; it should complement your home with beauty and functionality. Lock Surgeon's new Therma Tech garage doors do exactly that.
Lock Surgeon uses Steel Craft garage doors that use a sandwich construction method. Two layers of high quality steel and a solid EPS (expanded polystyrene) core that forms a true Thermal Break. A barrier of protection from the weather outside plus additional security for your home.
Contemporary
The simple elegance of the Contemporary styled door is well suited for many homes. Its paintable surface features a smooth woodgrain embossed face. Its sleek design can be complemented with one of twelve optional window styles.
Traditional
The Traditional panel is Northwest Door's most popular panel design. The small door panels add detail and charm to the face of your home and work well with most architectural styles. Features wood grain embossed 20" x 14" raised panels.
Ranch
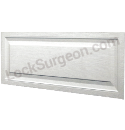
The Ranch panels are large, bold and impressive. The long, narrow design of the panels add length to the appearance of your home. Features woodgrain embossed 42" x 14" raised panels.
Carriage
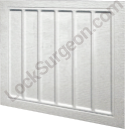
The Carriage panels offer a unique and stylish appearance to your home. Three optional decorative hardware kits can also be added to enhance the look and charm of swing type doors. Features woodgrain embossed 19" x 15" recessed carriage panels.
Standard Panel Configurations
| Door Width | Panels | ||
| Traditional | Ranch | Carriage | |
| 8', 9' | 4 | 2 | 4 |
| 10' | 5 | 2 | 4 |
| 12' | 6 | 3 | 6 |
| 14' | 7 | 3 | 6 |
| 16' | 8 | 4 | 8 |
| 18' | 9 | 4 | 8 |
Dual Window
Available for Contemporary, Ranch and Carriage Panels

Plain

Stockbridge

Arched Stockbridge

Cascade

Stockton

Heritage

Cathedral

Sherwood

Williamsburg

Ashton

Stockford

Waterford
Quad Window
Available for Traditional Panels

Plain

Stockbridge

Stockton

Cathedral

Sherwood

Williamsburg

Ashton

Stockford

Waterford

Cascade
Glass Options
Garage door windows are available on all new garage door models. Clear double strength annealed glass is standard. Insulated, tempered, tinted and other specialty glass types are available to suit your particular needs.

Clear (Standard)

Satin Etch

Obscure

Grey Tinted
Tested Tough
Every garage door is finished with a factory applied, baked-on, two coat polyester paint finish, giving years of maintenance free operation.

White

Almond

Sandstone

Brown
Note: The accuracy of the colours displayed may vary depending on the settings of your monitor. To obtain an exact colour reference, please contact Lock Surgeon at 780-448-9498 for colour samples.
Proven Performance from this premium renovation garage door
Therma Tech, Therma Tech II, Therma Max and Tri Tech are built using Northwest Door's time proven sandwich-type construction. This method of new garage door construction has proven itself to be superior on hundreds of thousands of Northwest Doors in homes across Canada and the US. A great choice of garage door replacement for the Alberta environment.
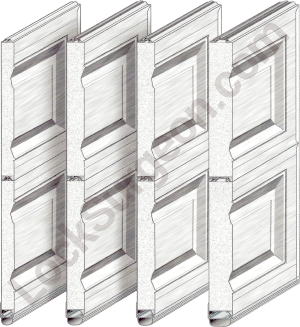
Therma Tech
1, 1/2" Thick EPS
R Value: 9
Therma Tech II
2" Thick EPS
R Value: 10.4
Therma Max
2" Thick High Density EPS
R Value: 12
Tri Tech
3" Thick High Density EPS
R Value: 16
New garage door interior and exterior galvanized prepainted steel skins are pressure laminated to a CFC-free expanded polystrene (EPS) core. This forms a true and natural Thermal Break. This new garage door construction is also both fire and smoke rated. 2" and 3" thick models also have a flexible joint seal running the full width of the doors.
The result is an extremely strong and beautiful maintenance-free garage door with outstanding insulating and sound deadening qualities.
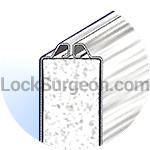
Tongue & Groove weather joint
w/ Thermal Break.
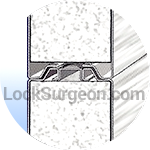
Energy efficient thermal barrier
joint seal on 2" & 3" thick doors.
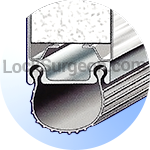
Adjustable retainer astragal.
No CFC's or HFC's
This new garage door product contains no ozone damaging Chloroflourocarbon or Hydrochloroflourocarbon present in some urethane foam products.
New Garage Door Standard Hardware Package
New garage doors are equipped with a standard lift track and torsion spring counterbalance system. Having a minimum cycle life of 10,000 cycles. All on-door operational hardware is glavanized and secured to door sections with zinc plated fasteners. New garage doors are also standard equipped with an adjustable retainer astragal (weather stripping) on the bottom of the door. Operation is manual push-up, although optional electric operation is recommended.
New Garage Door Hardware Options
High Lift Hardware, Low Head Room Hardware, Extended Life / High Cycle Springs and Powder Coated Track / Hardware.
Flush
The Flush garage door comes in standard heights of 6' through 18'. The standard headroom requirement of 12". Low headroom kits are available for special applications. For 18' wide doors, the maximum height is 8'.
| Height | 21" panels | 24" panels | Total Panels |
| 6' | - | 3 | 3 |
| 7' | 4 | - | 4 |
| 7' 3" | 3 | 1 | 4 |
| 7' 6" | 2 | 2 | 4 |
| 7' 9" | 1 | 3 | 4 |
| 8' | - | 4 | 4 |
| 8' 9" | 5 | - | 5 |
| 9' | 4 | 1 | 5 |
| 9' 3" | 3 | 2 | 5 |
| 9' 6" | 2 | 3 | 5 |
| 9' 9" | 1 | 4 | 5 |
| 10' | - | 5 | 5 |
| Hardware Clearance Type | Head Room | Side Room |
| Standard Lift | 12" | 3, 1/2" |
| Low Clearance | 3, 1/2" | 4, 1/2" |
Call Lock Surgeon Leduc for Mobile service or visit one of 3 new garage door sales and service centres to view and purchase New Garage Doors.
Lock Surgeon's Leduc mobile service handyman can remove your existing broken garage door and garage door track. He will then replace it with a new garage door track and new garage door with completely new garage door hinges, springs, drums and rollers. Often a new garage door renovation can be completed in one day. Your Leduc new garage door service installation team can meet with you at your home. They will review your current broken garage door and recommend a new replacement garage door that will best meet your needs.
Click Yellow Links Below for Detailed Information
Follow these links for related pages
Garage Door
Repair & Service
Leduc
*Garage Door
Repair & Adjustment
Leduc
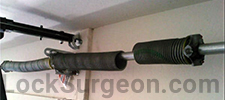
*Garage Door Spring Repair & Replacement Service Leduc

*Garage Door Opener Repair & Replacement Service Leduc

*Garage Door Parts
Springs & Hinges
Leduc
Mobile New Garage Doors Services Leduc
Mobile Parts & Service Leduc
Locksmith Sales and Service Centre
Lock Surgeon Store Edmonton South
Locksmith shop south Edmonton 5738 75 Street NW, Edmonton, Alberta, T6E 5X6

Servicing Edmonton South and area.
Click the link to find a location or service provider nearest you:
Lock Surgeon
Additional
Service Areas
Edmonton North West
17812 118 Ave
Locksmith Shop
Edmonton South East
5738 75 Street
Locksmith Shop
Calgary
2020 32 Ave NE
Locksmith Shop
JJ Completing A Residential Garage Door Removal - 10 min
We're here today to install a new garage door for a gentleman. This is JJ just pulling in with his overhead door truck. With all the tools he needs to accomplish this task. What we're going to do is get this old door raised up, its in really bad shape you can actually see holes in it and the bottom edge is rotted out. Its a perfect example of a door that needs replacing, an old wood door.
So JJ has gone ahead and setup his tools inside the garage and we're now going ahead and pulling off the components that are required to assemble the new garage door. Most of the assembly will be done inside the garage. He has some saw-horses setup, his tools laid out and he's made things safe for himself that no one is going to get hurt from anything poking out somewhere. It's always a good idea for the customer to cleanup their garage - a little bit more than this one - but we've seen a lot worse. We've seen garages with things stacked right to the outside. We really appreciate when things are moved out of our way because safety of course is a major concern.
These panels are heavy and awkward and take a little bit of balancing to get where they need to go. We want to do a good job so we don't want any panels that are going to be a problem because something has happened during transportation. The panels come packaged in cardboard and we have what's called a "dunnage" sheet on top of the truck. The dunnage stops the garage doors from being damaged while on the truck rack. We're just bringing them in now and putting them on the sawhorses which will give us a nice workstation to work from.
So besides the panels themselves and the track then there is the hardware components that are created for each and every door. Not every door is made the same so these are very specific hardware that are going to meet the components that we are putting in place for you. This particular one has whats called a "torque tube" so it won't have the spring pack like the old door had. But there is weatherstripping to go on after so we'll just leave that by the truck for now. We have everything arranged in here now so if there is a weather condition, should it rain or anything then we're all set because everything is inside.
The next thing to do after we have all our tools and setup done inside is to bring down the existing door. That we had raised up earlier and begin disassembling that unit from the inside. We have to be really careful here as that door is heavy. The door is old the springs are old, the cables are old, the hinges are old, for sure the brackets are old so J's going to start disassembling this door. We've got our tools like I said inside here theres a number of very specific tools we use for garage doors and winding bars the things he has in his hands now are among those.
Now we're going to take that spring and make it so that the tension is no longer on it. JJ said "Someone really tightened this down too hard when they installed it and the spring is binding on the shaft and it's not releasing the pins for us, that can be very dangerous when you are doing this..." - Pat interjects, and that's one of the things about these garage doors, the spring is a very integral part of the door. It takes the weight and transfers it to the spring so that the door doesn't take the poundage that it could be, that spring is taking the weight.
Very dangerous if it comes unwound too quickly or springs towards where J is working, it could take a hand off or smack a guy in the head you have to be very very careful. This is typically not a do-it-yourselfer project, there are a number of installation issues that could have happened prior to our arrival. Someone could have adjusted it themselves and created a dangerous point for us to work with. Its not something we can know ahead of time. We just have to get in there, get started and take note of issues as we work in that area.
while very dangerous, J's just giving me the opportunity to video this spring coming unravelled in an inappropriate manor. We do not normally do this, this is just for example to show the tension that is on this spring. Wow! Yeah, we don't want to be in the way of that or have something come flying off and hit us when thats going on.
So we're going to go ahead and remove the bracket that holds the garage door opener in place and then start removing the hinges. The top ones first and working done. We're taking the top bolts out of the hinges and J's going to remove the door one panel at a time. Then we'll start the additional track removal. It's a blessing when you've got the right tools and process and a guy like JJ here on our team that is very well trained and has a process to follow on how to take the doors apart. JJ has been in the industry now for 14 or 15 years and he's an expert at what he does. He can recognize a situation or problem very quickly and then find a solution to that problem. Here we have got a something where someone has doing a patch-up repair and that nut didn’t want to come off but we got it and it's out of the way.
Here JJ is removing the bottom part of that bracket, hinge-bracket, so that he can start taking these door panels out, one at a time. So here we are, the rollers and hinges have been disconnected and we're ready to pull the panel out. You have to be very careful because we don't want to end up with an avalanche of panels coming down. Take one out at a time being conscientious of our environment to not damage anything or hurt anyone. And J will just continue that all the way to the bottom.
While the installation is the main concern of clients and for ourselves there is a good deal of prep work that has to be done before we even get to the point. So we have the door panels removed and we're going to load them onto our truck because we'er going to remove and dispose of these panels at a dumpsite. Some of it will be recycled, some of the metal panels, individuals will come by and take some for a project they may have on the go at the cottage or shed. These rotted panel are for sure wood and will go to a wood chipper and be recycled at the dump.
While our garage door technician is doing this himself, it’s a heavy job, something that he has built up the muscle for over the years. It's not a job to be taken lightly, it's a lot of work and at the end of the day he deserves a good meal. So J is going to go ahead and cut the cables here, which would normally go up to the springs and just put that out of the way. Then we're going to pull the track off of one side so that we can get that last panel out of that channel. Then get the rollers out, this particular door was really well rotted, it's an old wood door that certainly needs replacing. Again, knowing which parts to take apart first is very important, we have to get this door disassembled.
There are companies that will just slap up new face as they call it and leave the old track there but often times there is something that may have been done wrong. The tracks are bent or well rusted and not all doors require the same hardware components. We want to make sure we get the right track to match the new door face, springs, rollers and hinges. You can bubblegum anything together but it doesn't mean that it's correct and it may even work for a couple of years. Doing the job from start to finish with all new hardware is the correct way to do it and every manufacturer will make that recommendation as well.
We're just going to get the horizontal tracks removed and get them off the shaft that is holding the springs. Like I said we want to make sure we're putting up all new hardware that's going to match the new garage door correctly. The last part to come down now is the shaft and spring and we're going to get that centre bracket taken off and get it all loaded onto the truck. All this metal is going to go to the metal recycling, everything gets disposed of and we take care of that for you.
JJ Completing A Residential Garage Door Installation - 20 min
A lot of what we hav done up to this point is remove the existing door. Now we're starting to get the hardware and the panels ready to go into the opening. There are some issues involved with that of course, with the hardware sent. We have to ensure that all the hardware sent is correct and prepare the hardware for assembly. I'm just going to show you something that's interesting with these garage doors it's something that you can look at too. Often time's there is a crack right along the middle of the garage floor. Typically in an older home that's a heave mark where the floor has heaved up in the middle and the two sides will be what I call fractured. The floor may have concrete tore apart there or the concrete may be raised on one side, just something to look at. We're always trying to seal up that door as best we can so we will review and discuss it with you while we're onsite as well.
Once we've sorted out our hardware its just a matter of doing some preliminary assembly on our workbench. The doors that we put together for you can be from a variety of manufacturers and are going to best match your garage door needs. The door is going to have clips that snap in place and then we're going to assemble the additional components that are going to hold the horizontal track in place. The fun part, the assembly of components on the door. We had to do some prep work, sort out our brackets, hardware, nuts and bolts. This component that is going on here is actually going on the top panel. It's a strengthening bar and in a little bit we're going to put the garage door motor mounting plate on as well. Then we will be working on putting the brackets on the garage door framing.
Now we’re going to put that mounting bracket on for the garage door arm to attach to, with a separate, reinforced component so that we're not tearing the door apart. We've got one panel in place now and our garage door technician is going to start assembling the components. Now we're putting the vertical track in place with the brackets and start stacking some of the panels on top of there and tagging them into place. Again there is specific hardware for each step along the way and we're going to make sure that things are level and square. This particular panel is sealing that bottom nicely as it has a nice big bottom strip of rubber that keeps that seal and helps keep out the weather and eventually even the mice out. That's something that is important that you might not think about, a garage door that seals is a valuable garage door.
So we've got three of the four panels stacked and no JJ is securing the track along side the door. The rollers are in place along the door and we're just going to make sure that the track is tracking the door properly vertically so that the door operates correctly and theres no binding. Prior to taking this shot we also levelled the door to ensure that the door was level from side to side and that everything will align with our future brackets. With the vertical tracks in place and now secure with the bolts, we're going to assemble the horizontal tracks that move the door from the door opening position up to the ceiling area. Sometimes we'll talk to our customers about having something called low headroom which is the space above the track. There has to be a certain amount of space there for the door to function and the brackets to work and then most importantly the door opener has to have the room to work in that space above the door.
We're just preparing to put the final panel in place. J is removing some of the packaging material then we're going to stack this fourth and final panel in the track. The vertical and horizontal tracks are in place and secure at this time and things are moving along nicely. It's a great looking door, certainly nicer than the rotten wood one that was falling apart. This is a nice secure galvanized steel and insulated door. We're going to get some insulation value out of that and some security and we won't have the wind or mice flowing through here.
Next step, put the cables in down along the side of the door to the bottom bracket. Often time that bottom bracket will rust out on the old garage doors and that cable will come loose and just snap or the loop will rust through and come apart. Nice new door everything is in great shape. Why does it rust out down there? Well, you've got your vehicle coming in and out and it has salt along the bottom carrying in from the road. As it melts it's going to rust out whatever is along the bottom of the door. Now these cables are galvanized and the track is galvanized so they're certainly going to last a long time but not forever.
JJ interjects "And one more point too is if you have poor weatherstrip along the side of the door. Right now we don't have any and you can see the opening you have there so if it's poor it's going to let the elements in and you'll have rain and snow and whatever coming in". We're going to make sure that the weatherstrip is nice and snug and this particular one. Since it's a new door, will be good but over time the doors loose its weatherstrip contact and need to be replaced.
This particular door has a torque tube, which is a different type of spring operating device recently developed. It's a newer way, I particularly like the spring pack better. This torque tube does the job though, and anything that is maintained properly is going to work for you if installed properly. We've got that torque tube up and now we're going to install the cable drums, there is some concern that the wood above the shaft was going to be in the way but it drop down into place nicely. It may not be very service friendly but we didn't have to modify that section where the 2x4 was retrofitted in place by someone else.
JJ - Going to tighten up the cables now that are seated on the drum, make sure our tension is out of there. Make sure our shaft is positioned properly and tighten that number 2 screw that holds our cable in place. A lot of people over-tighten things sometimes but that is not the case with this particular instance. You want to make sure this is good and tight and we want to set our shaft. This is a very odd shaped shaft, I'm going to have to take several attempts at this possibly. This door, you don't want to pick up either cause you can pick up the door and throw off your whole level.
Pat - If you didn't quite catch what happened there it's in the instructions in 3 different languages. It's a good thing to know. Something I like to talk about around the counter is how to assemble springs. It is a dangerous part of this door and it has to be done with absolute correctness to ensure we get this door functioning properly. So, what we have done there is use a specialty tool to wind the spring to give the spring torsion so that it will lift the door. The garage door opener is made to open the door but it's not made to take a lot of weight, it's the springs that lift that door.
Another issue that we’re dealing with here is called "back hanging" it's the support brace that we're going to put in place that's going to hold your horizontal track. It has to be done right and put in securely because it's going to take the weight of that door eventually when it opens up. JJ - I've seen old doors let go and fall onto cars and it's not fun. Pat - yeah it's a mess, you want to make sure that those screws are going up and into solid studs. This particular roof is sheeted, often times they are just drywalled. If you just screw up into the drywall it will let go and fall on top of the car, maybe not on day one but eventually they will.
We have to get this cross bracket in there as well, it stops the wobbling in the door, and stop the track from bouncing side to side. Everything has to be aligned properly, and not everyone is taking the time when they are assembling a garage door are making sure that all these things are aligned properly. Lock Surgeon staff have been trained to do ensure all of these things are done as your door is going in. We want to do business with you again we just don't want to do business with you over the same thing again within a month or two. We want to make sure we're getting that up for you and giving you no trouble at all for the length of the time you own that door.
So our overhead garage door technician has prebuilt the components of the garage door opener, a LiftMaster belt drive, it's our preferred opener to install, they are nice and quiet. J's just getting ready to install the bracket on the header so that the garage door opener has something to attach to on the wall. He has the right tools and he's centred that on the wall so that the garage door opener is going to track properly. We don't want things twisting so he's taken the appropriate measurements and checked with a level to ensure that placement is correct. He's also gone ahead a little while ago and placed the photo eyes. This is a safety device that goes across your door to prevent the door from trapping someone in the path of the door, it automatically changes direction.
Then we have the LiftMaster wall control mounted on the wall at a very specific height. If you're ever wondering why its' up so high, they do recommend that height. It's part of the regulations to prevent people from playing with it or bumping into it with maybe an elbow or their bum or a knee. It prevents a child from opening it up so because we don't want that to happen it's at a very specific height.
Now we're just getting the tip of that closers operator into that bracket JJ just mounted and aligned reasonably straight. With that we're going to do some double-checking in a minute. We're going to open up that door and let that opener rest atop of the garage door while we get some other things into place. J's going to get this door opened up and the door closer is going to rest up there on top of the door, you have to be careful because the door can open too quick and run off the end of the track. So just like the garage door horizontal brackets track we had to make sure the track had brackets to hold it up this door closer is going to require brackets to hold it in place as well. Brackets have been created and attached to the motor head and now it's a matter of getting that secured against the ceiling of the garage.
So now we have the motor mounted and the brackets secured and the beam for the motor track is now attached tot he door itself with this J-bracket. JJ is going along and attaching the cable that will run to the motor and thats for the safety photo eyes and the remote opener for the motor itself. Often times we've got a channel to run that through, in this particular case there is not a lot of room above the door so JJ is choosing to do the contemporary way of doing things which is simply using a u-type stapler.
We've got the wires all run to the head of the motor and JJ is going to insert those wires into the connecting points then after that we'll give the motor a try. Point of note we have also installed a surge protector here and we're going to plug the operator into that just to help it out if there is a lightning strike or an electrical surge of some sort. Now we're going to test that motor and you can hear some noise coming from the door opener but it's pretty quiet compared to a chain drive and the rock and rattle of a garage door that has been poorly installed. We will set the limits on this as well so that the door only opens the distance it should. Then when it comes back down its going to close to a specific point without the motor doing an over-run or pushing longer than it should.
Another feature we want to be concerned about is the battery back up the comes with this particular opener, so not all openers are created the same. This unit we've installed a surge protector and is outfitted with a battery backup, why? Well what happens if the power goes out and you can't open the door, that's going to become an issue. So with the battery backup that's going to allow for the opener communication to open that door or if the door is open it may be even more important if there is a storm on the way and you need to get that door closed. Or needing it to close so that the contents are not exposed to whoever is walking down the alley or the front street.
JJ - the nice thing with this garage door opener is that it has a number of special features along with the battery backup. It has an indication if your battery is charged, charging or empty. And also has an time and temperature display on the unit. As well as an ambient light sensor on it so if you're opening the door and it's dark it will turn on the lights for you so that you're not left in the dark trying to find the light switch. This unit also has other features like wifi so that you can have the MyQ app and run the opener with your cell phone from anywhere in the world. It also has a timer feature so you can have the door automatically close after a certain time. Or has a lock-out feature so if you are going away on holiday you can lock-out the remote openers and you can do that all from the touch of a button right here.
Okay, so what we're doing now is finishing off the weatherstripping on the outside of the door, making a nice seal all the way around to keep the general weather out, at least that's the idea. This garage isn't heated but it's always nice to keep the weather out, and bugs out as well, a great benefit to having a garage door installed properly.
So there it is a completed garage door, wow what a difference. Looking sharp and running nice it's going to be sealed up. You can run that remote from your vehicle, run it on wifi, we can set it up so that it has a timer on that remote you can run it from inside, fantastic. Thank you for joining us on an install that has gone really well. Lock Surgeon looks forward to helping you with your project.
Garage Door Assembly and Components - 3 min
Today we're taking you on a tour behind the door. We're going to see what goes into making Canada's premium residential and commercial garage doors. We're inside Steel Craft Door Products manufacturing plant in Edm, Alberta Canada. Now if you think it's just a warehouse full of parts that have been shipped from over seas, well, you're wrong. Steel Craft Doors are 100% Canadian made, 100%. Built by experts who know the extreme Canadian weather that these doors will face.
Believe it or not Steel Craft employees manufacture almost every component right on site. This gives Steel Craft total quality control, which ensures their products operate with a precision you won't find in any other door. All parts are built to exacting specifications and every Steel Craft door is computer balanced. Hinges, tracks, springs, weatherstrip even the garage door rollers are all made here entirely at Steel Craft. Steel Craft exclusively buys the highest quality of Canadian made steel, in fact there's 1000's of pounds of raw steel on hand at all times.
Now this is where the real magic happens. Steel Crafts innovated door panel manufacturing process creates a unique wood-grain pattern. A distinctive design available in many stylish colours. Steel Craft doors are injected with the highest quality polyurethane foam, resulting in the most thermally efficient insulated door on the market. This innovated process makes the door stronger and lasts longer by locking the inside skin to the outside shell. Steel Crafts high-tech, continuous in-line manufacturing process is guided by computerized and optical controls. This ensures a completely uniform, top quality precision engineered panel, each and every time. Optional windows are installed in many models for a high-class look.
Finally it's all packaged up and shipped to distributers all across the country. It's been awhile since Steel Craft first opened their doors, almost 50yrs ago. Today, innovation, dependability, quality craftsmanship and a commitment to a 100% Canadian made product continues to set them apart. Now that we've peeked behind the scenes you know why Steel Craft is the door with more.
WARRANTY
Sometimes Things Happen
No one likes it when things go wrong, no one more than us, but if it does check out our Warranty
Affiliations & Memberships:


